We are always working on the code for the display. Adding features, animations, art, etc. For the so inclined users we offer the ability to update to our latest binary to add all the new stuff to the display.
If you are happy with the display as is, or are afraid or unsure of the process to update, we recommend either getting someone to help, or just sticking with the code in your display currently. If you bring the display to a show we are at, we will update it for you. You “shouldn’t” be able to damage anything, but a failed flash could leave the display disabled until a proper flash can be done. We will try our best to help you if you need it or have any questions. Just email us at support@techdungeon.xyz with any questions you may have.
First connect your LED display to a USB port on your computer. You should here a noise when Windows detects the device being connected.
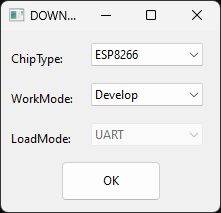
In order to flash the display with our new binaries you will need the Flash Download tool from Espressif Systems. Just download the “Flash Download Tools” on their site. You also want to download the binary at the bottom of this page you wish to flash into the display. Unzip the folder from the Flash download tools archive somewhere on your system, plug your display into your PC and run the flash download tool exe. You will see the first dialog pop up below on running it. You can just click OK to proceed.
You want to set the options as shown in the following picture below. Check the box to the left of the first edit box. Click the … to the right of it to bring up a file selector to select the file from us you wish to flash. In the box to the right of the @ symbol put in 0x0 (those are zeroes not the letter O).
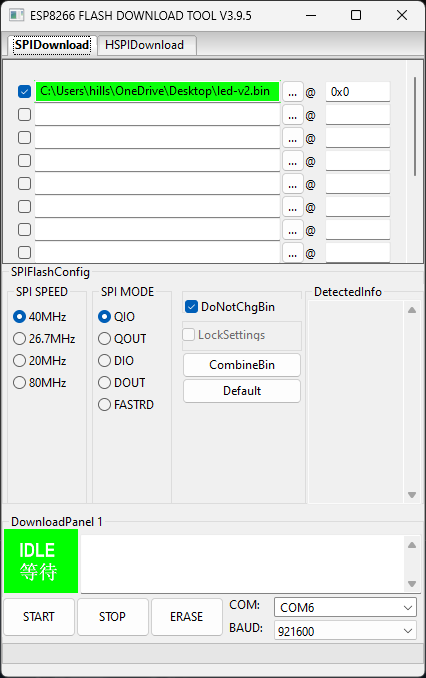
Make sure SPI speed is 40MHz, SPI Mode is QIO, DoNotChgBin is checked. In the bottom right make sure the COM port has selected whatever COM port your display is working as (mine is COM6, yours will vary). Set the BAUD to 921600 (you can just arrow down in that drop down if you don’t see 921600). If you have any issue finding the COM port you can go to your device manager (right click on your Windows start icon and select “Device Manager”). Then go to the ports section and look for the CH340 device. The picture below shows this.
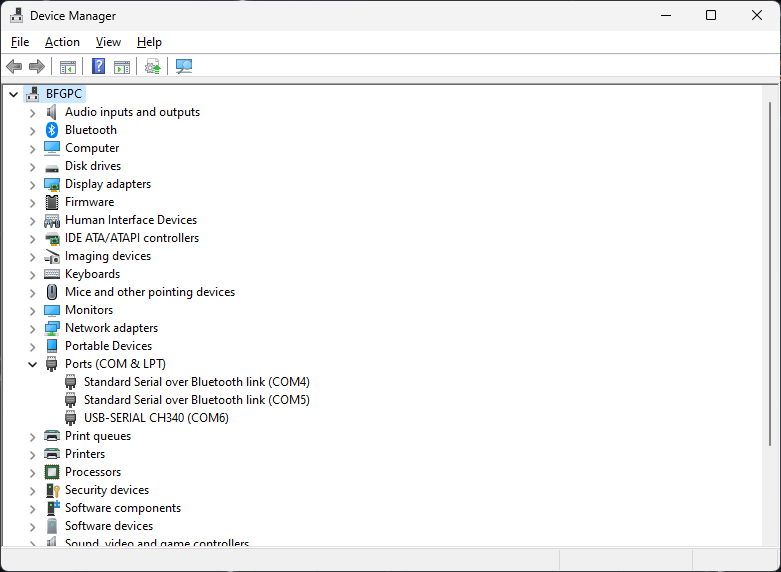
So in the above screenshot of my system the display is on COM6. I would use that in the dialog. Windows should auto-detect and install drivers automatically for the CH340 chipset used on the processor in the LED unit. If not you can go to this site and download and install the CH341SER.EXE file and install the drivers. You may have to reboot windows if instructed. You should then be able to unplug and re-plug the display to your computers USB port and you should see the CH340 device in your ports section as shown in the above screenshot.
Assuming you have all of that entered, you can just click start. It will take only about 10 seconds and it should flash the new binary to the display. The animations running on it will stop during this process and it will not resume the animations. You need to unplug and re-plug it in to see the new firmware running!
Enjoy the new stuff! Our binary releases are below.
Our initial VCF East April 2023 version is linked here
The v2 version is linked here
The latest v3 version from VCF Midwest September 2023 is linked here
Hey great product, bought one at VCF, do you have any plans to have the code be open source? I’ve been tinkering with mine but I can’t seem to fit more than one animation I to memory and wanted to take a look at your code to see how you were handling the image data storage…
Didn’t have the repository public after I posted the link. Sorry, it is public now!
Sorry for the delay in posting. Been out of town.
Off topic, but did you try the update here? I sent a few tweets at a couple people who bought the displays looking for testers on the update but never heard back from them. Just curious if someone was able to update my above binary on their display.
I have an initial posting on github at https://github.com/TheTechDungeon/LED-DISPLAY
That shows the basic use of it.
As for space. You will want to look into using PROGMEM to make sure your sprites go in ROM space instead of RAM.
My sample code doesn’t use PROGMEM because I was worried for people looking into basic operation and limited code knowledge it would be easier to understand.
Hello,
I purchased one of these at VCFED East, and when i try to update, the tool ask to select a chiptypefor the display. what do I choose?
William, I responded to your email on this (let me know if you didn’t get it). But I have updated this post above to contain updated pictures and a little more info on the update process.
Let me know if you got the emails (been having some issues with my email host which I thought have been fixed, but wanted to be sure).
Also let me know how the update went for you. Hope you like the new images and animations that have been added. Quite a bit since the VCFEast show.
OK Thanks, got it working. Looking forward to future updates
Great that it worked for you. Just to confirm, did you get my email responses also? Wanted to check that my email provider has sorted their issues.
Just wanted to say, I purchased the 16×16 LED display at the April VCF East event – absolutely love it! I just followed the instructions here to update my display to the v3 bin – worked flawlessly. Easy to follow instructions!
Glad the update was easy for you! Also glad to hear you love the display!